안녕하세요? 닉네임간편입니다. 이번 시간에는 Radiobutton 클래스에 대해 설명드리겠습니다.
1. RadioButton 클래스란
라디오 버튼은 아래와 같이 하나의 선택지를 선택하는 버튼으로, 주변에서 많이 볼 수 있는 것 중 하나입니다.

라디오 버튼은 일반적으로 특정 그룹 내에서 하나만 선택될 수 있습니다. 따라서 라디오 버튼을 만들 때 라디오 그룹을 먼저 만들고, 이 안에 라디오 버튼을 만들어 그룹화를 해야 합니다. 이렇게 하면 한 그룹의 라디오 버튼은 동시에 하나만 선택될 수 있고, 원하는 동작을 수행할 수 있습니다.
2. 예제를 통한 설명
먼저 라디오그룹을 만들고, 그 내부에 라디오 버튼을 만들어줍니다. 이때 세 개의 라디오 버튼이 동일한 가로길이를 갖도록 layout_width를 0dp로 설정하고 layout_weight을 1로 설정해주었습니다.
또한 라디오버튼이 수평으로 나열되도록 하기 위해서 라디오 그룹의 orientation을 horizontal로 설정했습니다. 이것이 가능한 이유는 라디오 그룹이 LinearLayout의 서브클래스이기 때문입니다.
<activity_main.xml> 라디오 그룹 및 라디오 버튼 부분
<RadioGroup
        android:id="@+id/group"
        android:layout_width="match_parent"
        android:layout_height="wrap_content"
        android:orientation="horizontal">
        <RadioButton
            android:id="@+id/radioRed"
            android:layout_width="0dp"
            android:layout_weight="1"
            android:layout_height="wrap_content"
            android:text="RED"/>
        <RadioButton
            android:id="@+id/radioBlue"
            android:layout_width="0dp"
            android:layout_weight="1"
            android:layout_height="wrap_content"
            android:text="BLUE"/>
        <RadioButton
            android:id="@+id/radioGreen"
            android:layout_width="0dp"
            android:layout_weight="1"
            android:layout_height="wrap_content"
            android:text="GREEN"/>
</RadioGroup>
이제 라디오버튼과 그룹을 만들었으니 메인 액티비티에서 이들을 정의하고, 리스너를 설정하여 실제로 동작하게 만들어보겠습니다.
// 라디오그룹에 리스너를 설정해서 라디오버튼이 클릭될 때마다 특정 동작을 수행한다.
group.setOnCheckedChangeListener(new RadioGroup.OnCheckedChangeListener() {
            @Override
            public void onCheckedChanged(RadioGroup group, int checkedId) {
                switch(checkedId) {
                    case R.id.radioRed: // radioRed 버튼이 선택되면
                    	// 글자를 "현재 선택된 색상은: " 에다가 선택된 버튼의 이름을 추가하여 설정
                        textView.setText("현재 선택된 색상은: "+radioRed.getText().toString());
                        textView.setBackgroundColor(Color.RED); // 텍스트뷰 배경색 지정
                        textView.setTextColor(Color.WHITE); // 글자색 지정
                        break;
                    case R.id.radioBlue:
                        textView.setText("현재 선택된 색상은: "+radioBlue.getText().toString());
                        textView.setBackgroundColor(Color.BLUE);
                        textView.setTextColor(Color.WHITE);
                        break;
                    case R.id.radioGreen:
                        textView.setText("현재 선택된 색상은: "+radioGreen.getText().toString());
                        textView.setBackgroundColor(Color.GREEN);
                        textView.setTextColor(Color.BLACK);
                        break;
                    default:
                        break;
                }
            }
        });
우선 라디오그룹에 OnCheckedChangeListener를 설정해줍니다. 이 리스너는 라디오 그룹 안의 선택된 라디오 버튼이 변경되었을 경우 호출되며 정의된 동작을 수행합니다. 전 선택된 아이템의 id를 바탕으로 switch 구문을 통해 아래의 TextView의 글자와 배경색, 글자색이 바뀌는 동작을 추가했습니다.
추가로 라디오버튼이 클릭되었을 때 기능을 넣고 싶다면 라디오 버튼에 OnClickListener를 설정해주면 됩니다. 저는 람다식을 이용해 라디오 버튼이 클릭될 때마다 토스트 메시지를 나오게 했습니다.
 radioRed = findViewById(R.id.radioRed);
        radioRed.setOnClickListener(e-> {
            Toast.makeText(this, "RED 버튼이 선택되었습니다.", Toast.LENGTH_SHORT).show();
        });
        radioBlue = findViewById(R.id.radioBlue);
        radioBlue.setOnClickListener(e-> {
            Toast.makeText(this, "BLUE 버튼이 선택되었습니다.", Toast.LENGTH_SHORT).show();
        });
        radioGreen = findViewById(R.id.radioGreen);
        radioGreen.setOnClickListener(e-> {
            Toast.makeText(this, "GREEN 버튼이 선택되었습니다.", Toast.LENGTH_SHORT).show();
        });
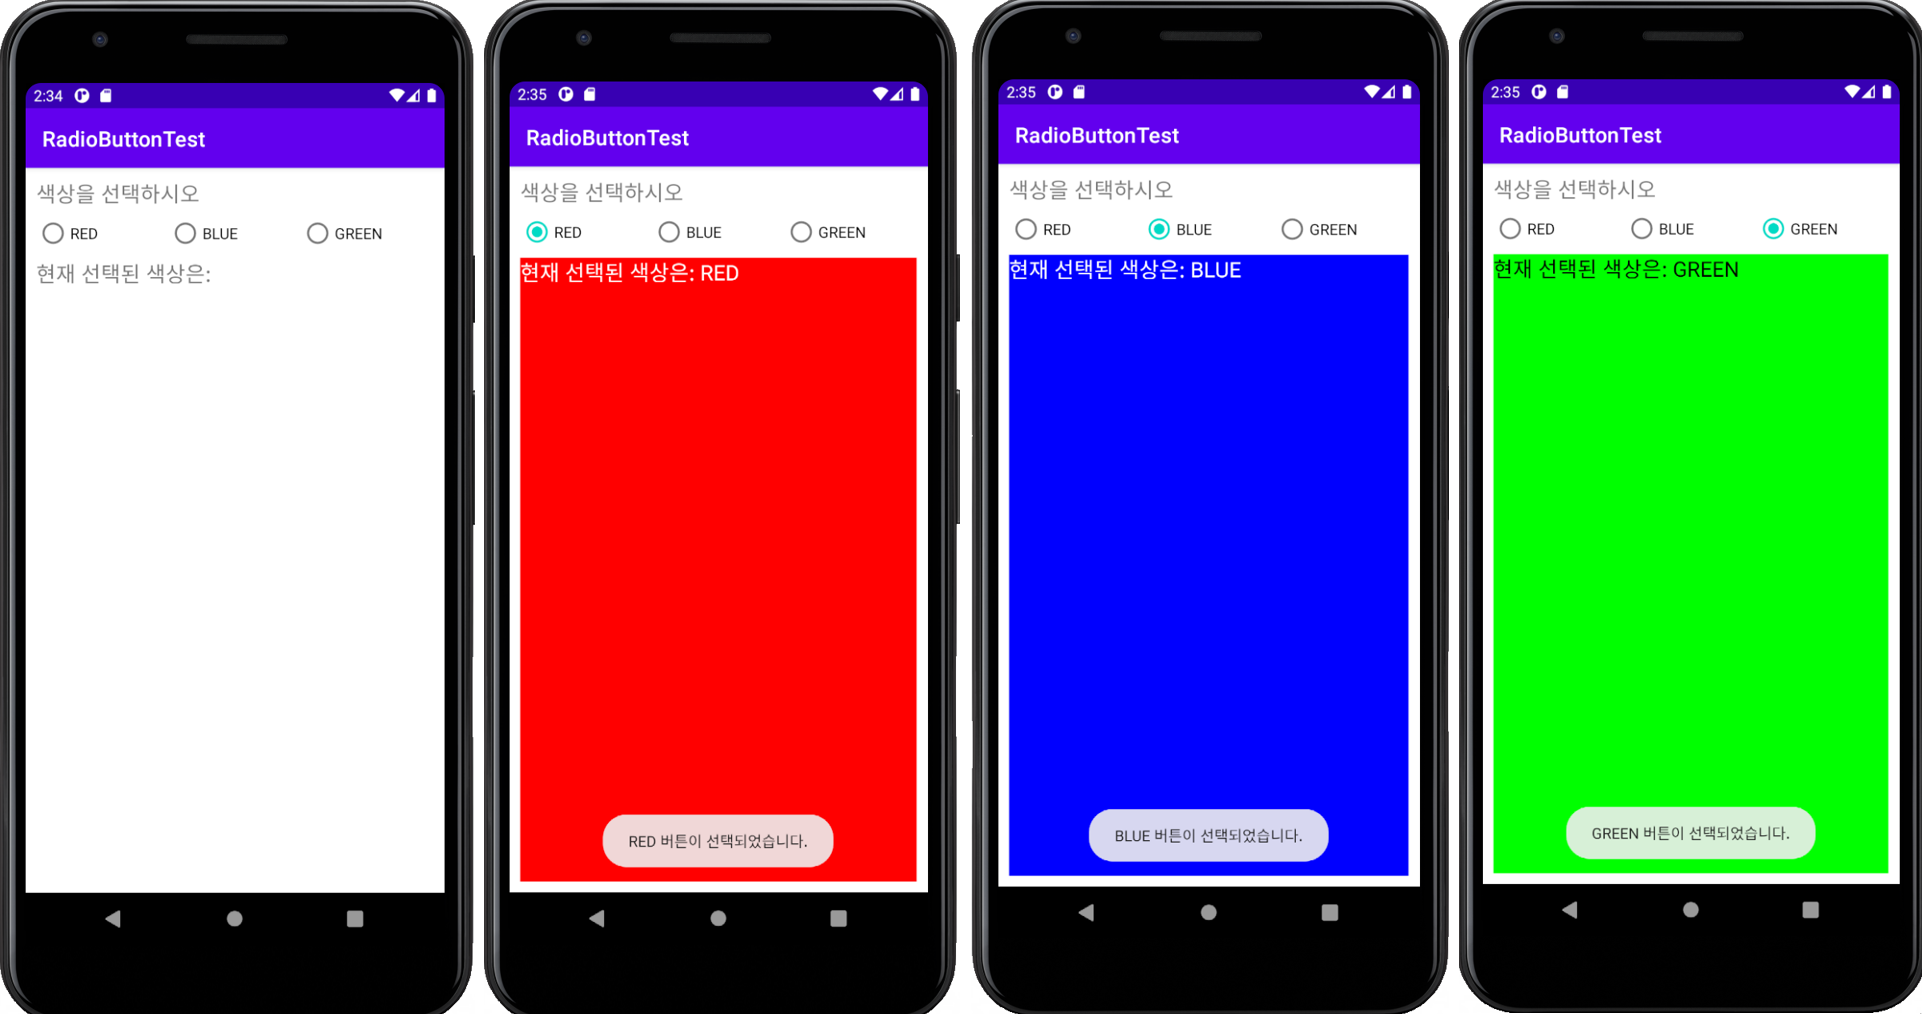
앱을 실행하면 다음과 같습니다.

잘 실행된 것이 보이시나요? 라디오 버튼을 선택했을 때 토스트 메시지가 출력되며, 글자와 글자색 및 배경색이 변경되는 것을 확인할 수 있습니다.
이때 주의하실 점이 한 가지 있습니다.
라디오 버튼에 설정하는 OnClickListener는 라디오 그룹 내에서 선택되었는지 여부에 관계없이 라디오 버튼이 클릭되기만 하면 특정 동작을 수행하도록 해줍니다. 즉, 라디오 버튼이 이미 선택되었더라도 계속 클릭하면 같은 동작이 수행되는 것입니다.
또한 라디오 그룹에서 설정한 OnCheckedChangeListener는 그룹 내 라디오 버튼의 선택 여부를 알아서 판단해주지만, 라디오 버튼에 설정하는 OnClickListener는 단지 클릭 여부만 판단해서 동작을 수행하기 때문에 이 또한 유의해야 합니다. 만일 라디오 버튼에서 선택 여부에 따라 동작을 수행하고 싶다면 if 조건문으로 isSelected() 메소드를 통해 구현하시면 되겠습니다.
3. 전체 소스
전체 소스는 다음과 같습니다. 만일 앞선 예제들을 따라 해 보셨는데 잘 되지 않는 분들은 패키지 명을 제외한 아래 소스를 복사해서 사용해보시길 바랍니다.
<activity_main.xml>
<?xml version="1.0" encoding="utf-8"?>
<LinearLayout xmlns:android="http://schemas.android.com/apk/res/android"
    xmlns:app="http://schemas.android.com/apk/res-auto"
    xmlns:tools="http://schemas.android.com/tools"
    android:layout_width="match_parent"
    android:layout_height="match_parent"
    android:orientation="vertical"
    tools:context=".MainActivity"
    android:padding="10dp">

    <TextView
        android:id="@+id/chooseTitle"
        android:layout_width="match_parent"
        android:layout_height="wrap_content"
        android:text="색상을 선택하시오"
        android:textSize="20sp"/>

    <RadioGroup
        android:id="@+id/group"
        android:layout_width="match_parent"
        android:layout_height="wrap_content"
        android:orientation="horizontal">
        <RadioButton
            android:id="@+id/radioRed"
            android:layout_width="0dp"
            android:layout_weight="1"
            android:layout_height="wrap_content"
            android:text="RED"/>
        <RadioButton
            android:id="@+id/radioBlue"
            android:layout_width="0dp"
            android:layout_weight="1"
            android:layout_height="wrap_content"
            android:text="BLUE"/>
        <RadioButton
            android:id="@+id/radioGreen"
            android:layout_width="0dp"
            android:layout_weight="1"
            android:layout_height="wrap_content"
            android:text="GREEN"/>
    </RadioGroup>

    <TextView
        android:id="@+id/textView"
        android:layout_width="match_parent"
        android:layout_height="match_parent"
        android:text="현재 선택된 색상은: "
        android:textSize="20sp"/>

</LinearLayout>
<MainActivity.java>-첫 번째 예제
package com.mybest.radiobuttontest;

import androidx.appcompat.app.AppCompatActivity;

import android.graphics.Color;
import android.os.Bundle;
import android.view.View;
import android.widget.RadioButton;
import android.widget.RadioGroup;
import android.widget.TextView;
import android.widget.Toast;

public class MainActivity extends AppCompatActivity {
    RadioGroup group;
    RadioButton radioRed;
    RadioButton radioBlue;
    RadioButton radioGreen;
    TextView textView;


    @Override
    protected void onCreate(Bundle savedInstanceState) {
        super.onCreate(savedInstanceState);
        setContentView(R.layout.activity_main);

        textView = findViewById(R.id.textView);
        group = findViewById(R.id.group);
        // 라디오그룹에 OnCheckedChangeListener 등록하기
        group.setOnCheckedChangeListener(new RadioGroup.OnCheckedChangeListener() {
            @Override
            public void onCheckedChanged(RadioGroup group, int checkedId) {
                switch(checkedId) {
                    case R.id.radioRed:
                        textView.setText("현재 선택된 색상은: "+radioRed.getText().toString());
                        textView.setBackgroundColor(Color.RED);
                        textView.setTextColor(Color.WHITE);
                        break;
                    case R.id.radioBlue:
                        textView.setText("현재 선택된 색상은: "+radioBlue.getText().toString());
                        textView.setBackgroundColor(Color.BLUE);
                        textView.setTextColor(Color.WHITE);
                        break;
                    case R.id.radioGreen:
                        textView.setText("현재 선택된 색상은: "+radioGreen.getText().toString());
                        textView.setBackgroundColor(Color.GREEN);
                        textView.setTextColor(Color.BLACK);
                        break;
                    default:
                        break;
                }
            }
        });

        radioRed = findViewById(R.id.radioRed);
        radioRed.setOnClickListener(e-> {
            Toast.makeText(this, "RED 버튼이 선택되었습니다.", Toast.LENGTH_SHORT).show();
        });
        radioBlue = findViewById(R.id.radioBlue);
        radioBlue.setOnClickListener(e-> {
            Toast.makeText(this, "BLUE 버튼이 선택되었습니다.", Toast.LENGTH_SHORT).show();
        });
        radioGreen = findViewById(R.id.radioGreen);
        radioGreen.setOnClickListener(e-> {
            Toast.makeText(this, "GREEN 버튼이 선택되었습니다.", Toast.LENGTH_SHORT).show();
        });
    }
}
4. 마무리
이것으로 라디오버튼에 대한 설명을 마치겠습니다. 이 정보가 많은 도움이 되었으면 좋겠습니다.
'Android > Palette' 카테고리의 다른 글
| [모든 팔레트 정복] 5. Layout(레이아웃) - 개요와 LinearLayout (0) | 2021.09.16 |
|---|---|
| [모든 팔레트 정복] 4. Widgets(위젯) part 2 (0) | 2021.09.15 |
| [모든 팔레트 정복] 3. Widgets(위젯) part 1 (0) | 2021.09.14 |
| [모든 팔레트 정복] 2. Button(버튼) (0) | 2021.09.13 |
| [모든 팔레트 정복] 1. Text Palette(텍스트 팔레트) (0) | 2021.09.12 |


