안녕하세요? 닉네임간편입니다. 이번 시간에는 안드로이드에서도 밀어주는 레이아웃인 ConstraintLayout에 대해서 알아보겠습니다.
1. 정의
뷰의 위치가 서로 다른 뷰 또는 부모 레이아웃과의 관계에 따라 결정되는 레이아웃입니다. 이는 RelativeLayout과 유사하지만 ConstraintLayout은 가로와 세로 각각에 하나 이상의 제약조건이 있어야 한다는 차이가 있습니다.
2. 유용성
우선 현재 안드로이드 스튜디오에서 자동으로 설정되는 디폴트 레이아웃이기 때문에 잘 사용하는 것이 좋습니다. 또한 RelativeLayout보다 더 유연하게 배치할 수 있습니다.
3. 위치 지정 방법
먼저 표시할 뷰의 위치를 정의하기 위해선 가로 및 세로에 제약 조건을 각각 하나 이상 추가해야 합니다. 예를 들어 다음 그림처럼 상하좌우 방향으로 지점을 연결해서 제약 조건을 설정하며, 이를 통해 위치를 표시합니다. 이 그림은 제약 조건이 모두 부모 레이아웃입니다.
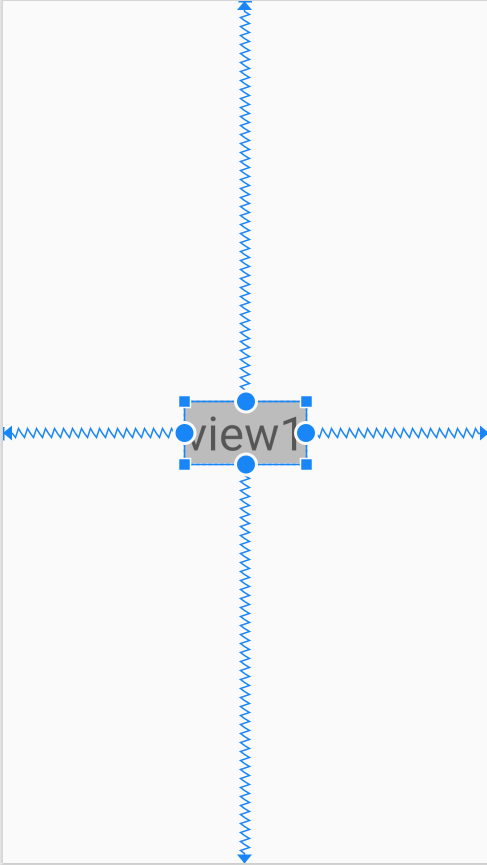
만일 제약조건이 누락된다면 뷰가 의도한 대로 표시되지 않을 수 있으므로, 꼭 잘 설정해주어야 합니다.
이때, 같은 평면을 공유하는 제약 조건만 사용할 수 있습니다.
즉, 어떤 요소가 제약 조건으로 사용할 수 있는 것은 그 요소의 부모 레이아웃과 부모 레이아웃의 직접적인 하위 요소입니다.
예를 들어 LinearLayout 안에 ConstraintLayout이 있고, 이 안에 Button이 있다고 가정하겠습니다. 이때 Button은 LinearLayout과 같은 평면에 있지 않기 때문에 이를 제약 조건으로 사용할 수 없습니다.
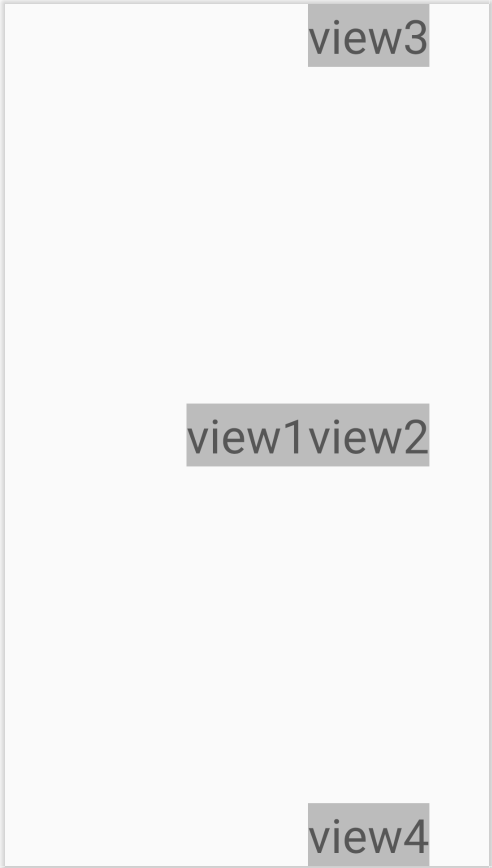
물론 하나의 요소에 대해서 다른 여러 개의 요소가 해당 요소를 제약 조건을 삼을 수 있습니다. 예를 들어 view가 순서대로 4개가 있다고 할 때, view2, view3, view4는 모두 view1의 오른쪽에 위치하도록 제약 조건을 설정할 수 있습니다.
[activity_main]
<?xml version="1.0" encoding="utf-8"?>
<androidx.constraintlayout.widget.ConstraintLayout xmlns:android="http://schemas.android.com/apk/res/android"
    xmlns:app="http://schemas.android.com/apk/res-auto"
    xmlns:tools="http://schemas.android.com/tools"
    android:layout_width="match_parent"
    android:layout_height="match_parent">

    <TextView
        android:id="@+id/view1"
        android:layout_width="wrap_content"
        android:layout_height="wrap_content"
        android:background="@color/moredarkgray"
        android:text="view1"
        android:textSize="40sp"
        app:layout_constraintBottom_toBottomOf="parent"
        app:layout_constraintEnd_toEndOf="parent"
        app:layout_constraintStart_toStartOf="parent"
        app:layout_constraintTop_toTopOf="parent" />
    <TextView
        android:id="@+id/view2"
        android:layout_width="wrap_content"
        android:layout_height="wrap_content"
        android:background="@color/moredarkgray"
        android:text="view2"
        android:textSize="40sp"
        app:layout_constraintBottom_toBottomOf="parent"
        app:layout_constraintStart_toEndOf="@id/view1"
        app:layout_constraintTop_toTopOf="parent" />
    <TextView
        android:id="@+id/view3"
        android:layout_width="wrap_content"
        android:layout_height="wrap_content"
        android:background="@color/moredarkgray"
        android:text="view3"
        android:textSize="40sp"
        app:layout_constraintStart_toEndOf="@id/view1"
        app:layout_constraintTop_toTopOf="parent" />
    <TextView
        android:id="@+id/view4"
        android:layout_width="wrap_content"
        android:layout_height="wrap_content"
        android:background="@color/moredarkgray"
        android:text="view4"
        android:textSize="40sp"
        app:layout_constraintBottom_toBottomOf="parent"
        app:layout_constraintStart_toEndOf="@id/view1" />

</androidx.constraintlayout.widget.ConstraintLayout>
이 그림을 보면 view2부터 view4는 모두 뷰의 왼쪽에 해당하는 지점이 view1의 오른쪽에 위치하도록 제약 조건이 설정되었습니다.
그러나 각각 상하 제약 조건이 다르기 때문에 다른 곳에 위치해있는 것을 알 수 있습니다.
4. 추가적인 기능
[activity_main]
<?xml version="1.0" encoding="utf-8"?>
<LinearLayout xmlns:android="http://schemas.android.com/apk/res/android"
    xmlns:app="http://schemas.android.com/apk/res-auto"
    xmlns:tools="http://schemas.android.com/tools"
    android:layout_width="match_parent"
    android:layout_height="match_parent"
    android:orientation="vertical">

    <androidx.constraintlayout.widget.ConstraintLayout
        android:layout_width="match_parent"
        android:layout_height="wrap_content"
        android:layout_marginTop="30dp">

        <TextView
            android:id="@+id/view1"
            android:layout_width="wrap_content"
            android:layout_height="wrap_content"
            android:background="@color/moredarkgray"
            android:text="view1"
            android:textSize="40sp"
            app:layout_constraintEnd_toStartOf="@+id/guideline1"
            app:layout_constraintStart_toStartOf="parent"
            app:layout_constraintTop_toTopOf="parent" />

        <TextView
            android:id="@+id/view2"
            android:layout_width="wrap_content"
            android:layout_height="wrap_content"
            android:background="@color/moredarkgray"
            android:text="view2"
            android:textSize="40sp"
            app:layout_constraintStart_toEndOf="@+id/guideline1"
            app:layout_constraintEnd_toEndOf="parent"
            app:layout_constraintTop_toTopOf="parent" />

        <androidx.constraintlayout.widget.Guideline
            android:id="@+id/guideline1"
            android:layout_width="wrap_content"
            android:layout_height="wrap_content"
            android:orientation="vertical"
            app:layout_constraintGuide_end="266dp" />
    </androidx.constraintlayout.widget.ConstraintLayout>

    <androidx.constraintlayout.widget.ConstraintLayout
        android:layout_width="match_parent"
        android:layout_height="wrap_content"
        android:layout_marginTop="100dp">

        <TextView
            android:id="@+id/view4"
            android:layout_width="150dp"
            android:layout_height="wrap_content"
            android:background="@color/moredarkgray"
            android:text="view4"
            android:textSize="40sp"
            app:layout_constraintStart_toStartOf="parent"
            app:layout_constraintTop_toTopOf="parent" />

        <TextView
            android:id="@+id/view5"
            android:layout_width="100dp"
            android:layout_height="wrap_content"
            android:background="@color/moredarkgray"
            android:text="view5"
            android:textSize="40sp"
            app:layout_constraintStart_toStartOf="parent"
            app:layout_constraintTop_toBottomOf="@id/view4" />

        <TextView
            android:id="@+id/view6"
            android:layout_width="250dp"
            android:layout_height="wrap_content"
            android:background="@color/moredarkgray"
            android:text="view6"
            android:textSize="40sp"
            app:layout_constraintStart_toEndOf="@+id/barrier2"
            app:layout_constraintTop_toBottomOf="@id/view5" />

        <androidx.constraintlayout.widget.Barrier
            android:id="@+id/barrier2"
            android:layout_width="wrap_content"
            android:layout_height="wrap_content"
            app:barrierDirection="end"
            app:constraint_referenced_ids="view5, view4"/>
    </androidx.constraintlayout.widget.ConstraintLayout>

    <androidx.constraintlayout.widget.ConstraintLayout
        android:layout_width="match_parent"
        android:layout_height="wrap_content"
        android:layout_marginTop="100dp">
        <TextView
            android:id="@+id/view7"
            android:layout_width="wrap_content"
            android:layout_height="wrap_content"
            app:layout_constraintStart_toStartOf="parent"
            app:layout_constraintEnd_toEndOf="parent"
            app:layout_constraintTop_toTopOf="parent"
            android:background="@color/littlegray"
            android:text="view7"
            android:textSize="40sp" />
    </androidx.constraintlayout.widget.ConstraintLayout>

    <androidx.constraintlayout.widget.ConstraintLayout
        android:layout_width="match_parent"
        android:layout_height="wrap_content">
        <TextView
            android:id="@+id/view8"
            android:layout_width="wrap_content"
            android:layout_height="wrap_content"
            app:layout_constraintStart_toStartOf="parent"
            app:layout_constraintEnd_toEndOf="parent"
            app:layout_constraintTop_toTopOf="parent"
            android:background="@color/moredarkgray"
            app:layout_constraintHorizontal_bias="0.8"
            android:text="view8"
            android:textSize="40sp"/>
    </androidx.constraintlayout.widget.ConstraintLayout>

    <androidx.constraintlayout.widget.ConstraintLayout
        android:layout_width="match_parent"
        android:layout_height="match_parent"
        android:layout_marginTop="50dp">

        <TextView
            android:id="@+id/view9"
            android:layout_width="wrap_content"
            android:layout_height="wrap_content"
            android:background="@color/moredarkgray"
            android:text="view9"
            android:textSize="40sp"
            app:layout_constraintTop_toTopOf="parent"
            app:layout_constraintEnd_toStartOf="@id/view10"
            app:layout_constraintStart_toStartOf="parent" />

        <TextView
            android:id="@+id/view10"
            android:layout_width="wrap_content"
            android:layout_height="wrap_content"
            android:background="@color/moredarkgray"
            android:text="view10"
            android:textSize="30sp"
            app:layout_constraintBaseline_toBaselineOf="@+id/view9"
            app:layout_constraintEnd_toStartOf="@+id/view11"
            app:layout_constraintStart_toEndOf="@+id/view9" />

        <TextView
            android:id="@+id/view11"
            android:layout_width="wrap_content"
            android:layout_height="wrap_content"
            android:background="@color/moredarkgray"
            android:text="view11"
            android:textSize="20sp"
            app:layout_constraintBaseline_toBaselineOf="@+id/view9"
            app:layout_constraintEnd_toEndOf="parent"
            app:layout_constraintStart_toEndOf="@id/view10" />
    </androidx.constraintlayout.widget.ConstraintLayout>
</LinearLayout>
1) 안내선(Guideline)
사용자에게는 보이지 않는 선을 추가할 수 있습니다. 이를 기준으로 뷰에 자유롭게 제약을 가해 위치를 지정할 수 있습니다.
안내선은 총 3가지 속성을 사용할 수 있습니다.
a. layout_constraintGuide_begin
왼쪽 또는 상단부터 주어진 값만큼 떨어져서 배치됩니다.
b. layout_constraintGuide_end
오른쪽 또는 하단부터 주어진 값만큼 떨어져서 배치됩니다.
c. layout_constraintGuide_percent
0부터 1 사이 값을 가질 수 있으며 해당 값만큼 전체 길이에 비례해서 배치됩니다. 예를 들어 값이 0.5로 설정되었다면 전체 길이의 50%에 해당하는 곳에 배치됩니다.
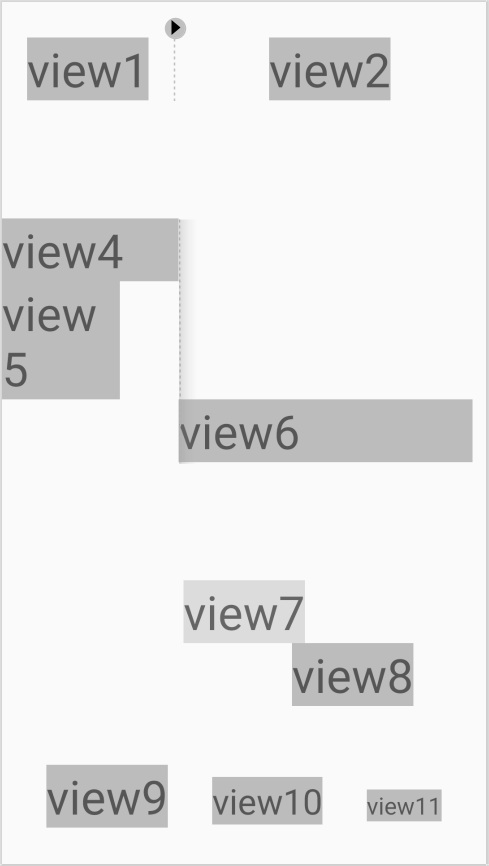
위 그림의 첫 번째 예시를 보면 안내선이 설정되어있고 이를 제약 조건으로 삼은 뷰 객체를 볼 수 있습니다.
2) 경계선(Barrier)
뷰의 위치에 제약을 가할 수 있습니다. 다만 경계선은 자체 위치를 정의하지 않으며 경계선 내로 제한된 뷰의 위치를 기반으로 경계선 위치가 이동됩니다.
경계선에는 크게 다음과 같은 속성이 중요합니다.
a. constraint_referenced_ids
id로 여러 개의 뷰를 참조하여 경계선의 기준을 삼습니다.
b. barrierDirection
경계선의 방향을 설정합니다. 만일 이것이 end로 설정된다면 경계선의 오른쪽으로 뷰가 위치하도록 경계를 설정합니다.
위 그림의 두 번째 예시로 설명하겠습니다. 먼저 경계선을 만든 후, constraint_referenced_ids를 이용해 view4와 view5를 참조합니다. 그리고 barrierDirection을 end로 설정해서 이 경계선의 오른쪽 방향으로 경계를 지정합니다.
이후 view6의 왼쪽이 경계선의 오른쪽에 위치하도록 설정하면, 아래 그림과 같이 경계선 영역 우측에 존재하게 됩니다. 이때 view6의 위쪽 제약 조건을 view5의 아래쪽으로 설정했으므로 그림처럼 배치가 됩니다.
여기서 view4의 크기와 view5의 크기가 다를 때 경계선은 view4를 기준으로 삼고 있는 것을 확인할 수 있습니다. 경계선은 따로 위치를 직접 지정하는 것이 아니라, 참조한 뷰들 중 길이가 가장 긴 것을 기준으로 배치됩니다. 따라서 길이가 더 긴 view4를 기준으로 배치된 것입니다.
3) 편향(Bias)
두 제약조건 사이의 위치를 조절할 수 있습니다. 기본적으로 편향은 50%로 설정되어있으며, 값이 작아질수록 가로는 오른쪽(끝쪽)에서 왼쪽(시작 쪽)으로, 세로는 위쪽에서 아래쪽으로 이동하게 됩니다.
위 그림의 세 번째 예시를 보면, view7과 view8은 모두 양쪽을 부모 레이아웃으로 제약 조건을 설정했지만 위치가 다릅니다. view8의 경우 bias를 0.8로 설정해서, 전체 너비의 80%에 해당하는 곳에 위치하게 되었기 때문입니다.
4) 기준선(Baseline)
각 뷰의 기준선을 이용해 뷰의 문자열을 기준으로 정렬할 수 있습니다.
위 그림의 네 번째 예시를 보면 view10과 view11이 view9를 기준선으로 삼은 걸 볼 수 있습니다. 따라서 view10, 11은 따로 상단이나 하단에 제약을 두지 않고도 view9의 문자열 하단 부분을 기준으로 배치된 것을 확인할 수 있습니다.
5. 마무리
이번 시간에는 ConstraintLayout에 대해서 알아보았습니다. 이 레이아웃은 안드로이드에서 밀어줄 만큼 매우 중요하면서 유용한 레이아웃이기에 설명드릴 부분이 많고, 따라서 다음 시간에도 제약 레이아웃에 대해서 알아보겠습니다.
'Android > Palette' 카테고리의 다른 글
| [모든 팔레트 정복] 11. Layout(레이아웃) - ConstraintLayout part2 (1) | 2021.09.25 |
|---|---|
| [모든 팔레트 정복] 9. Layout(레이아웃) - GridLayout (0) | 2021.09.23 |
| [모든 팔레트 정복] 8. Layout(레이아웃) - TableLayout (0) | 2021.09.19 |
| [모든 팔레트 정복] 7. Layout(레이아웃) - FrameLayout (0) | 2021.09.18 |
| [모든 팔레트 정복] 6. Layout(레이아웃) - RelativeLayout (0) | 2021.09.18 |


